
Canvas Studio, integrated with Canvas LMS, facilitates efficient video creation, management, and publishing. Key features include:
- Recording videos via webcam, screen capture, or both
- Basic editing (e.g., trimming and cutting)
- Creating and editing captions
- Hosting and publishing videos
This resource page highlights these essential features and offers guidance on using them effectively. We will continue to expand our support materials to help you fully explore and utilize Canvas Studio.
Getting Started
Supported Platforms
Browsers

Use Chrome and Edge, not Firefox or Safari, as Canvas Studio is optimized for these browsers.
Mobile Devices
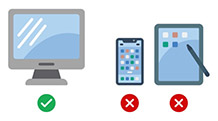
Canvas Studio is optimized for desktops and not supported on mobile browsers. Do not use it on mobile device.
Studio Basics
Accessing Studio
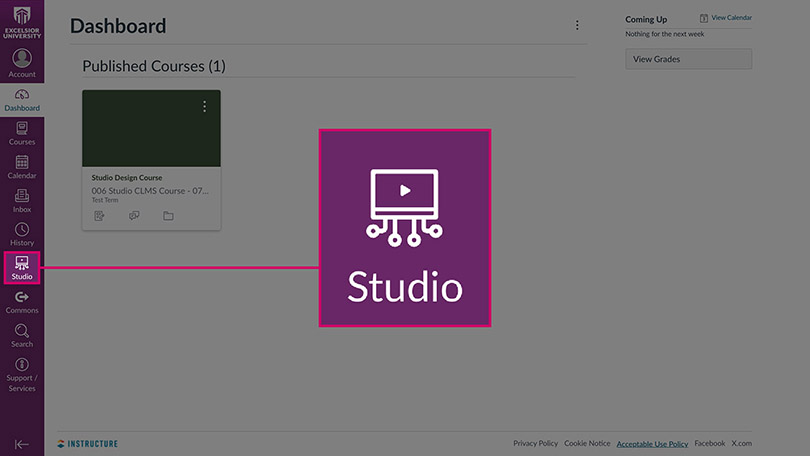
To access Canvas Studio, click on the Studio icon in the global navigation menu (furthest left navigation).
Navigation and Layout
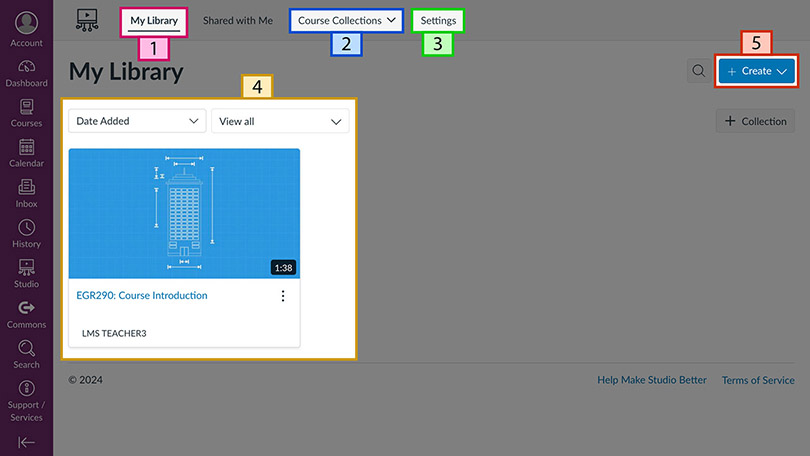
At the top of the Studio home interface, you’ll find the two main libraries where your videos are stored: My Library [1] and Course Collections [2]. The same menu bar also includes Settings [3], where you can configure global Studio settings. In the center, you’ll see all the videos you’ve recorded or uploaded [4]. To the top right, the Create button [5] gives you access to the recording and uploading tools.
The two main areas where videos are managed—My Library and Course Collections—may appear similar, but they are distinct and operate independently, with no content linking between them and differing feature sets.
Think of My Library as your personal film studio, where you record, edit, and store your original videos. When you embed a video from My Library into a course, it creates a copy in that course’s Course Collection, similar to distributing a film to different theaters. Each version is distinct, both in relation to the original and to other copies used. These copies are not linked, so any changes made to one will not affect the others—they are entirely independent of each other.
Critical Settings
Before recording or uploading a video, it’s important to ensure your caption settings are properly configured.
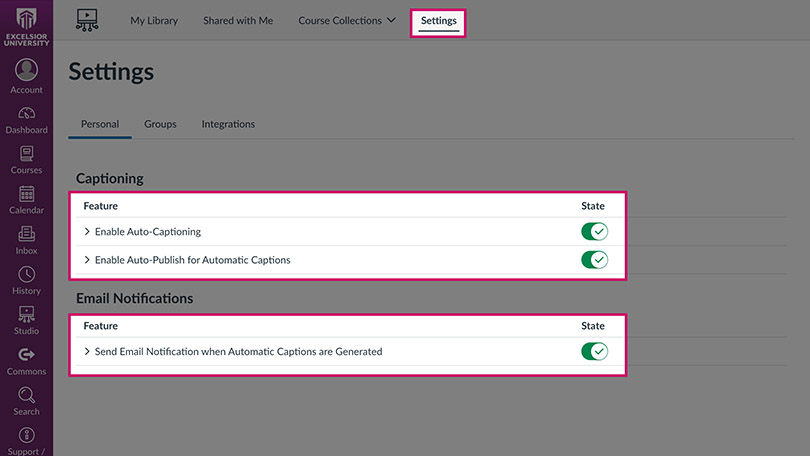
In Studio, go to Settings and turn on Enable Auto-Captioning and Enable Auto-Publish for Automatic Captions. This ensures your video is captioned and the captions are published immediately. To receive email notifications when your captions have been created and published, turn on Send Email Notification when Automatic Captions are Generated.
Note: Auto-generated captions are only ~85% accurate. You’ll still need to review them for accuracy, which this guide covers in the Captioning section
Creating and Editing
Recording
Canvas Studio offers three recording options:
Webcam Video: Record using only your webcam (e.g., speaking directly to the camera).
Screen Capture Video: Capture content directly from your screen (e.g., demonstrating a task in Microsoft Excel).
Screen Capture + Webcam Video: Combine screen capture with webcam video (e.g., presenting slides with your webcam visible in the lower right).
Select the option you need from the tabs further below.
Tip: Anytime you record:
- Ensure your recording environment is quiet, private, and well-lit, with minimal chances of disturbance.
- Silence or close any applications on your computer that may generate notifications or distractions. Also, turn off or mute any devices that could create noise, such as your phone or a ceiling fan.
Recording a Webcam Video
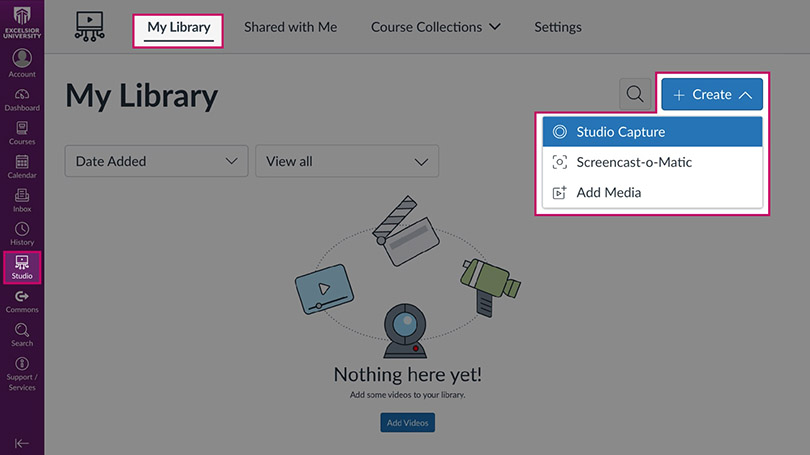
In Studio, make sure you are in My Library. Then, click the Create button and select Studio Capture.
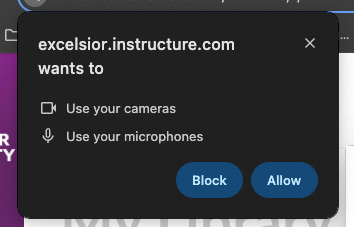
Studio Capture will launch, and you may be prompted to grant access to your camera and microphone. If so, click Allow.
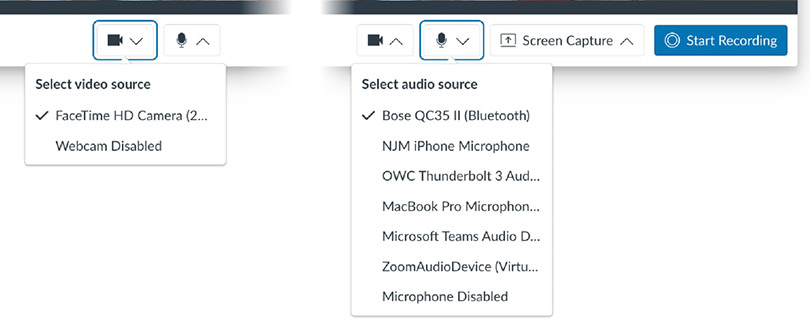
Select your preferred Camera and Microphone.
If your microphone is functioning properly, you should see the light blue audio level indicator moving when you speak.

Now review your video preview and aim to follow these guidelines:
- Position your camera at eye level to avoid looking up or down at a sharp angle. Ensure the bottom of the video frame is at mid-chest, with your head just below the top, leaving a small gap. You may need to adjust the height of your chair, desk, or camera.
- Make sure your face is well-lit, ideally brighter than your background but not so bright that it appears washed out. The best way to achieve this is by positioning your main light source, like a window, in front of you rather than behind.
These are just guidelines—do your best to follow them, but it’s okay if you’re not able to.
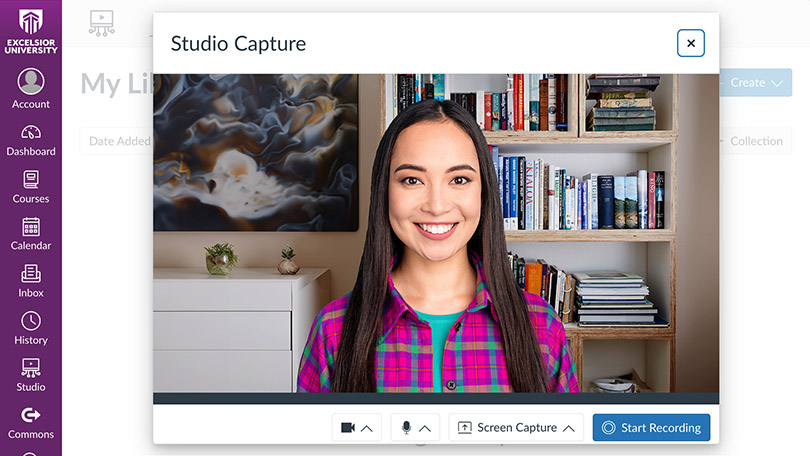
When you’re ready, click the Start Recording button to begin your recording session. A countdown will begin, and recording will start when it finishes.

Tip:
At the start of the recording, smile and look into the camera for a few seconds before speaking. Do the same at the end. This provides a clean start and finish, which you can refine later with the editor.
During recording, look directly at the camera rather than the video preview. If you’re using notes, place them near the camera and glance at them only occasionally to maintain good eye contact. Even if looking at the camera creates a slight upward or downward eye line, it’s still better than not looking at the camera at all, as avoiding eye contact will appear less natural and be less engaging.
Use the Pause and Continue buttons to suspend and resume recording without ending your session. However, this will create time jumps in your recording, so it’s best to avoid using them.
When you want to end your recording session, click the Finish button.
In the Title text box, give your recording a descriptive name so you can easily identify its content and version (e.g. EGR101 Introduction – Original). Click the Save Media button to save your recording to My Library, or click the Start Over button to discard it and begin a new recording session.

After saving your recording, it will appear in your My Library.
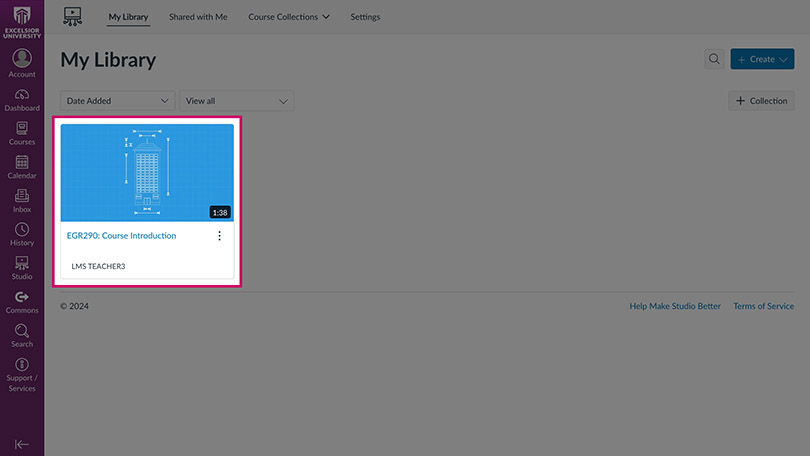
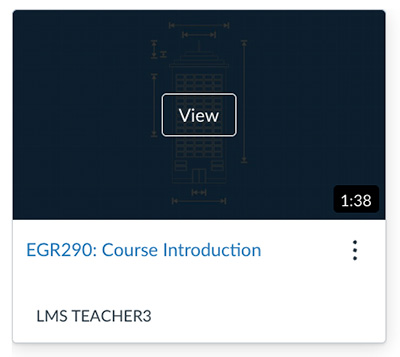
To watch your recording, hover over it and click the View button.
Now, before publishing your video to students, make sure to
- Make any necessary refinements using the editing tools (trimming, cutting) and update the details as needed (title, description, tags).
- Review the captions and make sure they’re accurate.
Recording a Screen Capture Video
Canvas Studio screen recording is optimized for Full-HD (1920 x 1080) recordings. For best results, use a screen resolution of 1920 x 1080 or lower, as higher resolutions may reduce performance and video quality. Mac users should review macOS how-to guides, and Windows users should review Windows how-to guides for instructions.
For macOS users, you’ll also need to give your browser permission to screen record. Review macOS how-to guides for instructions.
In Studio, make sure you are in My Library. Then, click the Create button and select Studio Capture.

Studio Capture will launch, and you may be prompted to grant access to your camera and microphone. If so, click Allow.

In camera options, select Webcam Disabled and select your preferred Microphone.
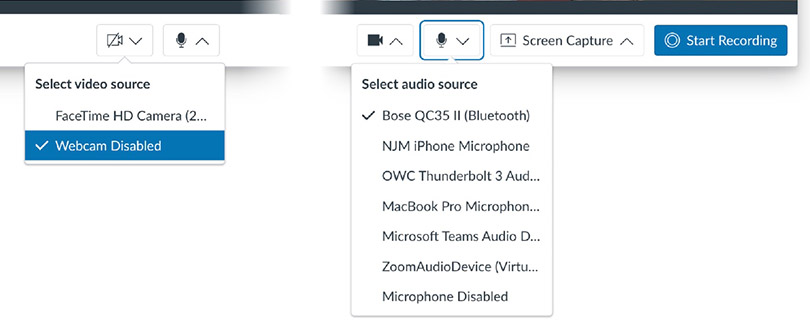
If your microphone is functioning properly, you should see the light blue audio level indicator moving when you speak.

Click the Screen Capture button, select Enabled, and the sharing options will appear.
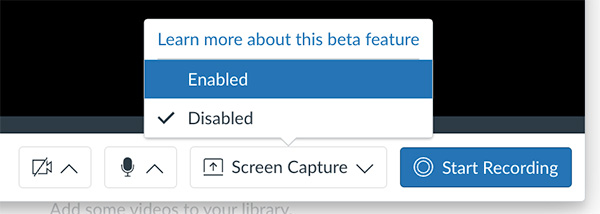
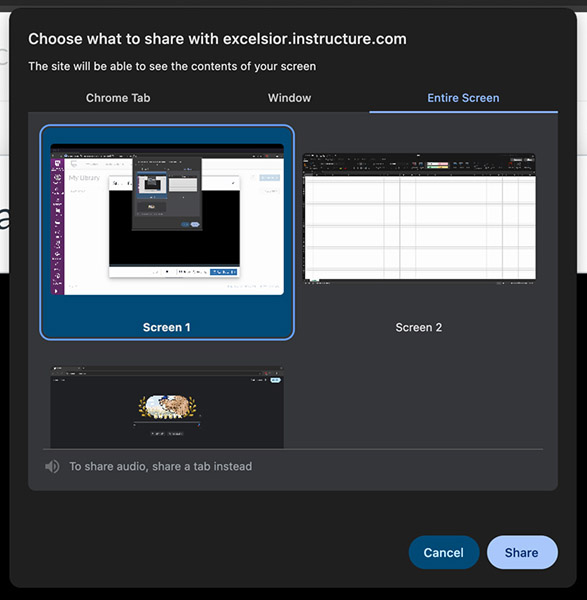
There are three options for screen sharing: Browser Tab, Window, and Entire Screen. Browser Tab allows the selection and sharing of a specific browser tab. Window enables the sharing of a specific open application. Entire Screen records the entire display chosen.
It is recommended to choose Entire Screen, move what you want to record to that screen, and set your application window to full-screen mode. This option is preferred as it is not limited to a specific application, allowing you to switch between applications and continue recording seamlessly.
Click Share when you’re ready to begin screen sharing. Note that this action does not start recording; it only initiates screen sharing.
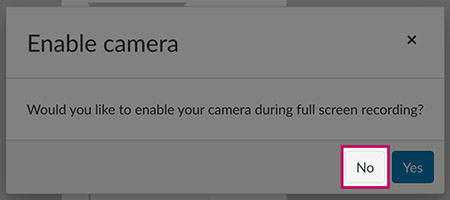
A prompt will appear asking if you want to enable your camera during full-screen recording. Select No.
Before recording, review your Studio Capture preview and assess the legibility of the text and key elements in what you are sharing to ensure they are appropriately sized. Consider how these elements will appear when viewed at an embedded size on a course page, rather than just on your display. Make any necessary adjustments to improve clarity. The example below demonstrates content that is too small.
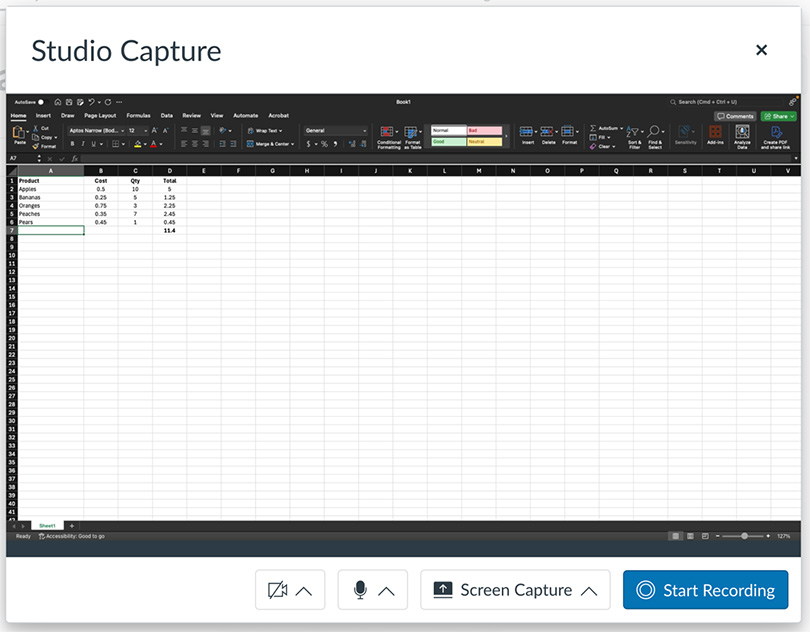
When you’re ready, click the Start Recording button to begin your recording session. A countdown will begin, and recording will start when it finishes.

Tip: At the start of the recording, pause for a few seconds before speaking. Do the same at the end. This provides a clean start and finish, which you can refine later with the editor.
The controls for your screen recording will be located on the Studio page during your session.

Use the Pause and Continue buttons to suspend and resume recording without ending your session.

When you want to end your recording session, click the Finish Recording button.

In the Title text box, give your recording a descriptive name so you can easily identify its content and version (e.g. EGR101 Introduction – Original). Click the Save Media button to save your recording to My Library, or click the Start Over button to discard it and begin a new recording session.

After saving your recording, it will appear in your My Library.

To watch your recording, hover over it and click the View button.

Now, before publishing your video to students, make sure to
- Make any necessary refinements using the editing tools (trimming, cutting) and update the details as needed (title, description, tags).
- Review the captions and make sure they’re accurate.
Recording a Screen Capture + Webcam Video
Canvas Studio screen recording is optimized for Full-HD (1920 x 1080) recordings. For best results, use a screen resolution of 1920 x 1080 or lower, as higher resolutions may reduce performance and video quality. Mac users should review macOS how-to guides, and Windows users should review Windows how-to guides for instructions.
For macOS users, you’ll also need to give your browser permission to screen record. Review macOS how-to guides for instructions.
In Studio, make sure you are in My Library. Then, click the Create button and select Studio Capture.

Studio Capture will launch, and you may be prompted to grant access to your camera and microphone. If so, click Allow.

Select your preferred Microphone.
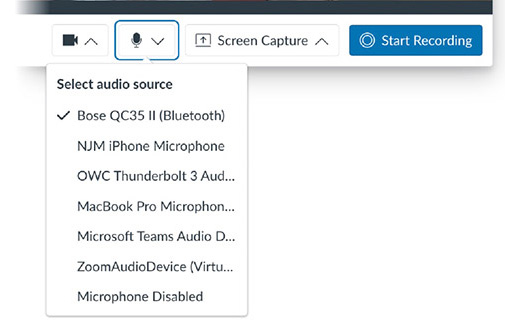
If your microphone is functioning properly, you should see the light blue audio level indicator moving when you speak.

Click the Screen Capture button, select Enabled, and the sharing options will appear.

There are three options for screen sharing: Browser Tab, Window, and Entire Screen. Browser Tab allows the selection and sharing of a specific browser tab. Window enables the sharing of a specific open application. Entire Screen records the entire display chosen.
It is recommended to choose Entire Screen, move what you want to record to that screen, and manually adjust your application window to fill the display. This adjustment is necessary because webcam video cannot overlay an application in full-screen mode. However, this limitation does not apply to PowerPoint presentations in presentation mode.
For optimal results, select the display with your webcam so that when you look at your screen, you are also facing the camera.
Click Share when you’re ready to begin screen sharing. Note that this action does not start recording; it only initiates screen sharing.

A prompt will appear asking if you want to enable your camera during full-screen recording. Select Yes.
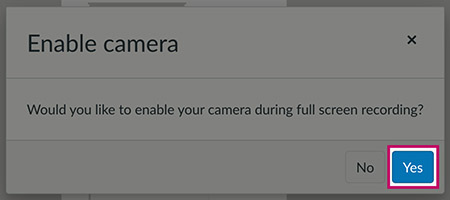
Your webcam preview window will now appear over the Studio Capture preview. Review your video preview and aim to follow these guidelines:
- Position your camera at eye level to avoid looking up or down at a sharp angle. Ensure the bottom of the video frame is at mid-chest, with your head just below the top, leaving a small gap. You may need to adjust the height of your chair, desk, or camera.
- Make sure your face is well-lit, ideally brighter than your background but not so bright that it appears washed out. The best way to achieve this is by positioning your main light source, like a window, in front of you rather than behind.
These are just guidelines—do your best to follow them, but it’s okay if you’re not able to.
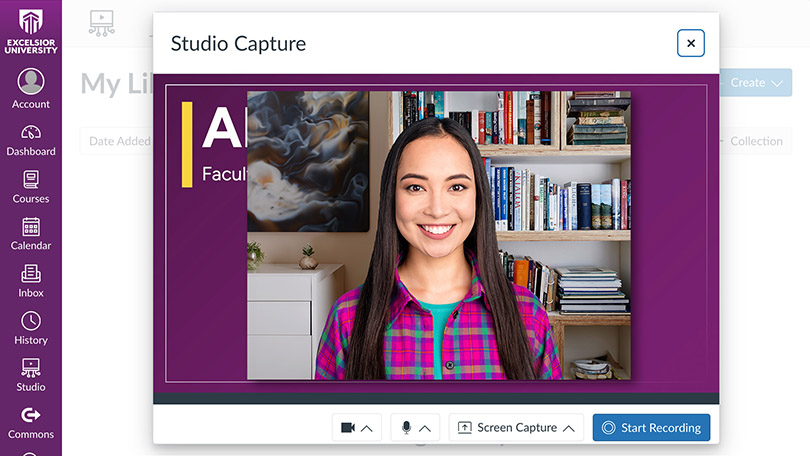
Hover over your webcam preview window, click and hold, then drag it to the screen you are sharing. Arrange the webcam preview neatly with the content you are displaying. To adjust the size of the webcam preview, hover over the top left corner until the resize indicator appears, then click, hold, and drag inward toward the middle of the preview. Release when you are satisfied with the size.
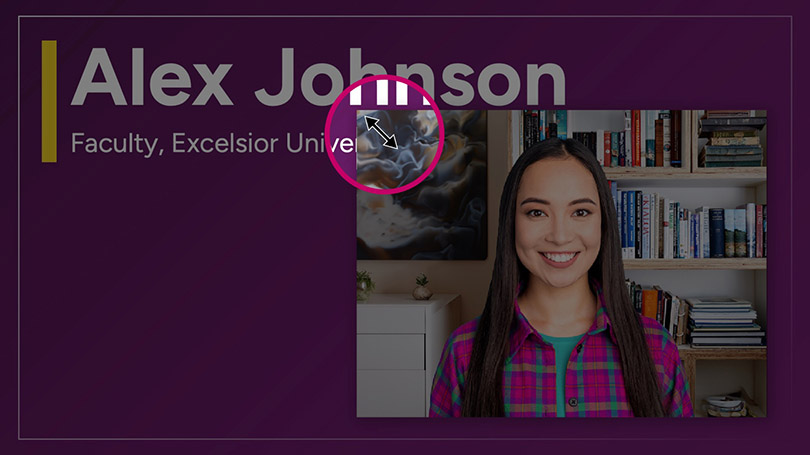
Ensure the webcam video is balanced with the content on the screen, prioritizing the content. The webcam video should not cover or dominate the frame. For most situations, placing the webcam preview in the right corner works well, keeping it proportionate to the content.
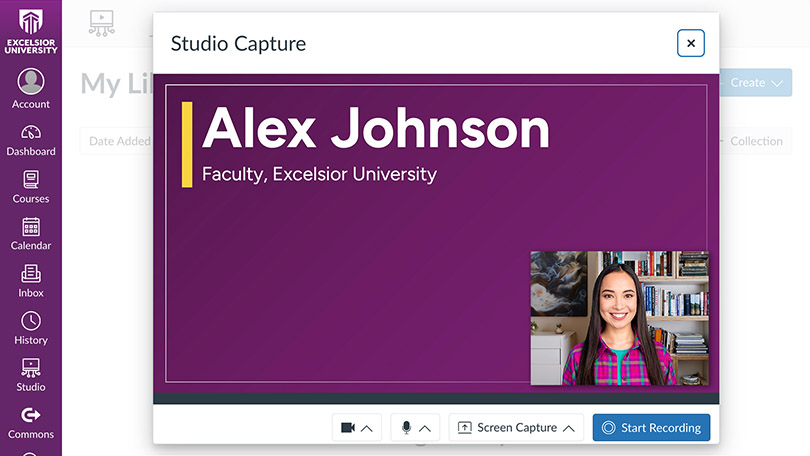
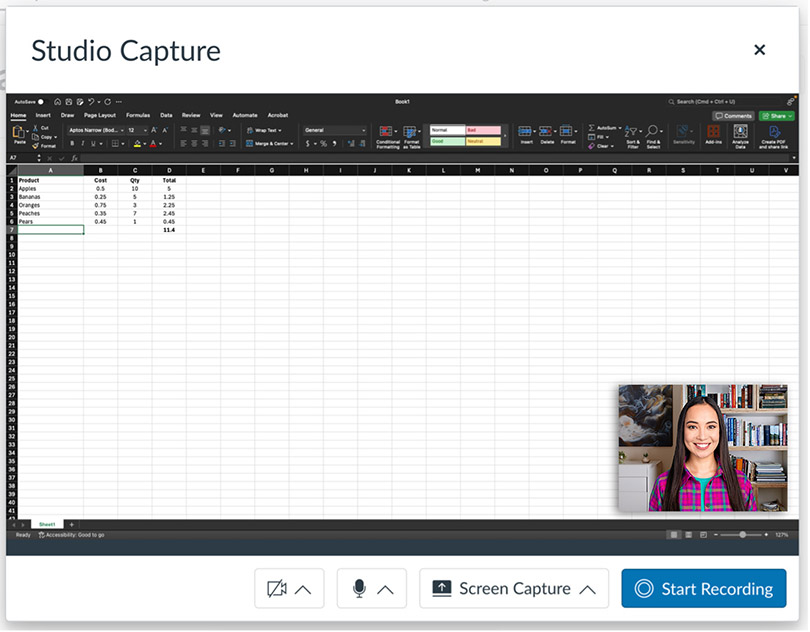
Finally, do one last review of the Studio Capture preview and assess the legibility of the text and key elements in what you are sharing to ensure they are properly sized. Consider how these elements will look when viewed at an embedded size on a course page, rather than just on your display. Make any necessary adjustments to improve clarity. The example below demonstrates content that is too small.
When you’re ready, click the Start Recording button to begin your recording session. A countdown will begin, and recording will start when it finishes.

Tip:
At the start of the recording, smile and look into the camera for a few seconds before speaking. Do the same at the end. This provides a clean start and finish, which you can refine later with the editor.
During recording, look directly at the camera rather than the video preview. If you’re using notes, place them near the camera and glance at them only occasionally to maintain good eye contact. Even if looking at the camera creates a slight upward or downward eye line, it’s still better than not looking at the camera at all, as avoiding eye contact will appear less natural and be less engaging.
The controls for your screen recording will be located on the Studio page during your session.

Use the Pause and Continue buttons to suspend and resume recording without ending your session.

When you want to end your recording session, click the Finish Recording button.

In the Title text box, give your recording a descriptive name so you can easily identify its content and version (e.g. EGR101 Introduction – Original). Click the Save Media button to save your recording to My Library, or click the Start Over button to discard it and begin a new recording session.

After saving your recording, it will appear in your My Library.

To watch your recording, hover over it and click the View button.

Now, before publishing your video to students, make sure to
- Make any necessary refinements using the editing tools (trimming, cutting) and update the details as needed (title, description, tags).
- Review the captions and make sure they’re accurate.
Uploading
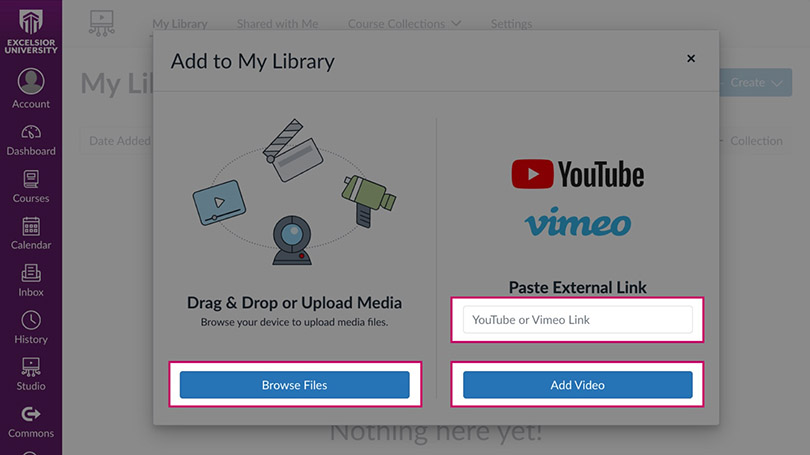
In Canvas Studio, you can upload video files and add content from YouTube or Vimeo. For details on supported file formats, refer to Canvas Studio’s resource page.
Click on Studio in the global navigation menu.
Next, ensure you are in My Library. Then, click on Create and select Add Media.
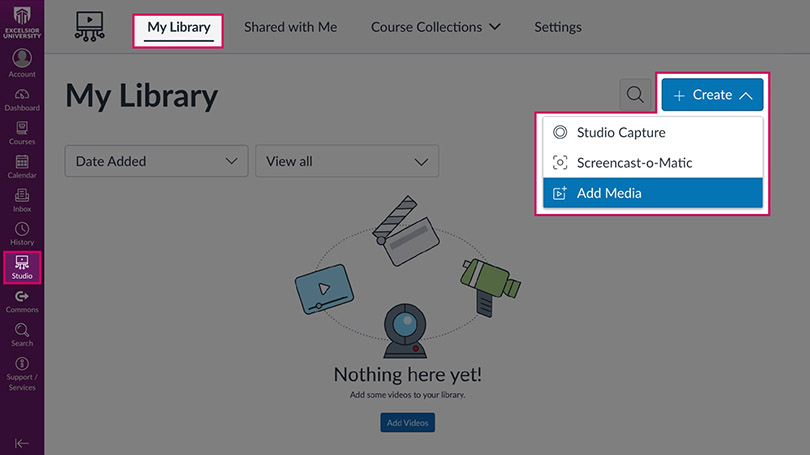
To upload a video file, click the Browse Files button, locate your file and click Open.
To upload a YouTube or Vimeo video, paste the URL into the text field and click the Add Video button.
Details
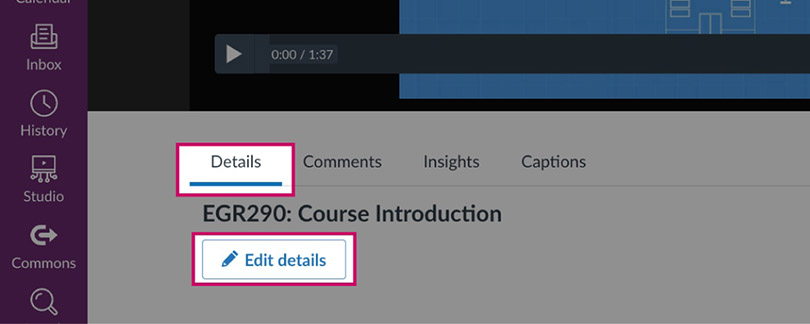
Details are where you can change a video’s title, description, and tags.
In Studio, hover over a video and click the View button.

Click Details then the Edit details button.
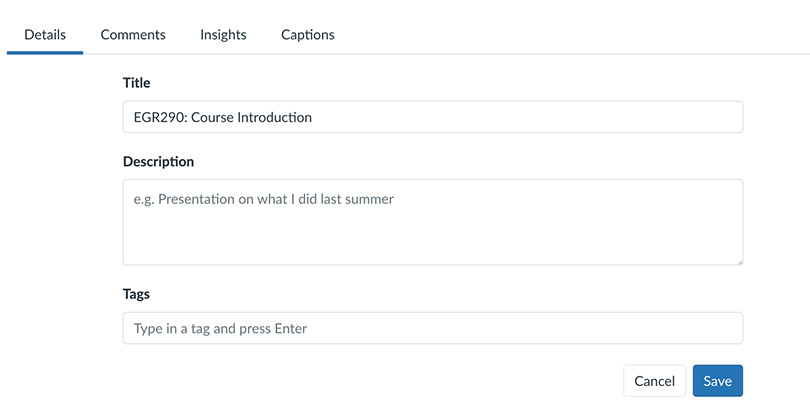
Update the title, description, and tags as needed using the text fields, then click Save.
Note: Its strongly recommended to give your recordings a descriptive name so you can easily identify its content and version (e.g. EGR101 Introduction – Original). The description and tags are optional, but can be added if you find them useful.
Editing
In Studio, click the three horizontal dots on your video, then select Edit Media. This will launch the editor.
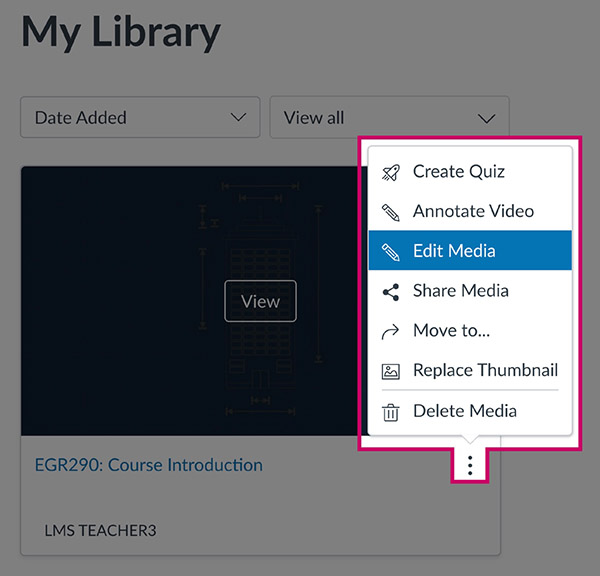
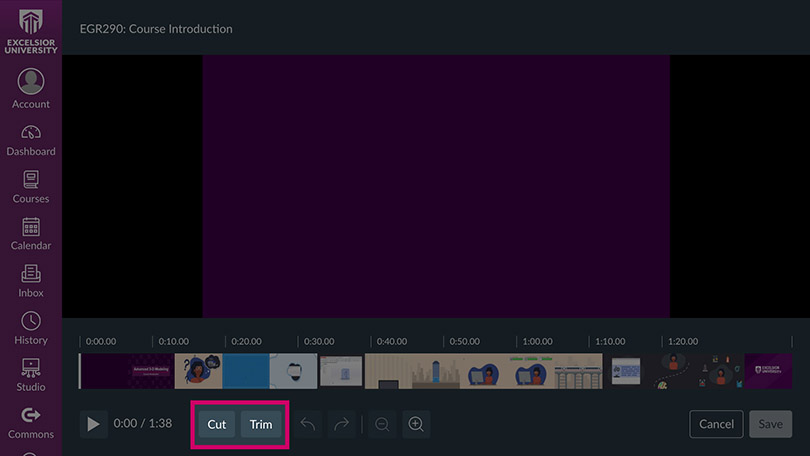
There are two too editing tools you can use to refine your video – Cut and Trim. Cut removes a section from the middle of the video, while Trim adjusts its start or end.
Cut
To cut a video, click the Cut button.

A red line will appear at the beginning of your video to indicate the current cut position. You can shift the cut by hovering over the middle of the red line, then clicking, holding, and moving it forward or backward. To adjust the duration of the cut, hover over the left or right side of the line, then click, hold, and drag to change the start or end points.

Click the Confirm Cut button when you are happy with your adjustments.

Click the Save button to Save your trims and cuts.

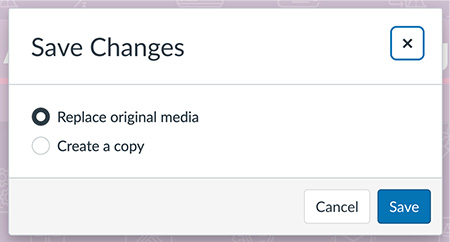
Click Replace original media if you don’t need the unedited version, or Create a copy if you do. Click the Save button to confirm your choice and save.
Trim
To trim a video, click the Trim button.

Handles will appear at the beginning and end of your video timeline, along with an indicator showing the start and end times of your video.
Drag the handle at the beginning of the timeline to the right to trim the start of the video, and drag the handle at the end to the left to trim the end. As you make these adjustments, the time indicator will update, and the parts to be removed will be highlighted in red.

Click the Confirm Trim button when you are happy with your adjustments.

Click the Save button to Save your trims and cuts.

Click Replace original media if you don’t need the unedited version, or Create a copy if you do. Click the Save button to confirm your choice and save.

Captioning
Note: Auto-generated captions can take a few minutes to process. If you check them immediately after recording or uploading your video, they might not be available right away.
In Studio, click the three horizontal dots on your video, then select Edit Media. This will launch the editor.

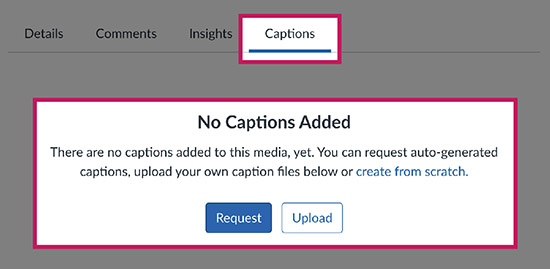
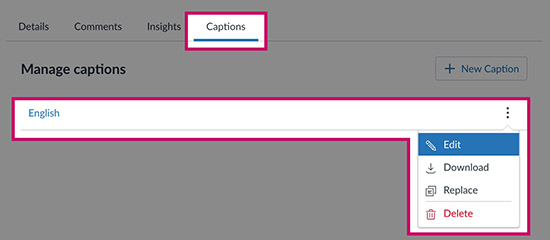
Click Captions, and you’ll see either a No Captions Added message or one English caption.
If you see the No Captions Added, click the Request button and then select the correct Language. This will create your auto-generated captions. For future videos, update your studio settings so that captions are automatically generated.
Now click on the three vertical dots and select Edit.
If you see Review and Publish instead, click that, but you’ll need to review your studio settings to make sure future videos have their captions automatically published.
In the captions editor, you can preview your video with captions in the video player on the right side of the page [1]. To edit captions, click on a caption line [2] and use the tools in the Edit Captions section [3]. You can modify the text in the Caption Text field and adjust the start and end times by clicking Edit… next to the timecodes. Use the Search for tool to find specific text and the Replace… tool for batch replacements [4]. To insert a line of captions, click the + Insert Line button [5]. All changes are automatically saved as you make them.
Note: “Accurate captions” means the text must match exactly what is spoken in the video, including contractions, false starts, and repeated phrases, without edits or corrections. The goal is to provide a precise textual representation of the spoken content, ensuring viewers have the same experience as those hearing the audio directly.
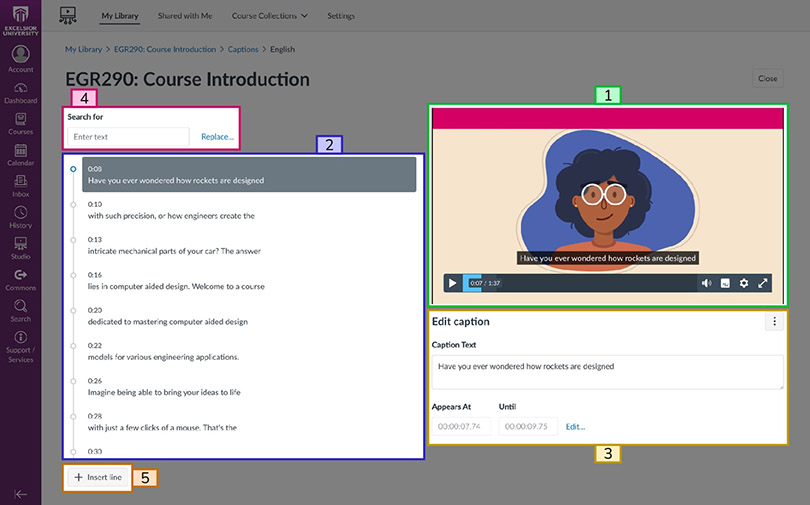
Once you’ve finished editing your captions, click the Close button to exit the caption editor and save your changes. If a Publish button appears next to it, be sure to click it to ensure your captions are published.

3. Publish
To publish a video from Your Library to a course, go to your discussion or announcements
Start your discussion or announcement post, and in the Content Editor, click the Apps icon, then choose Canvas Studio. If you don’t see Canvas Studio, click View All, search for Studio, and select it.
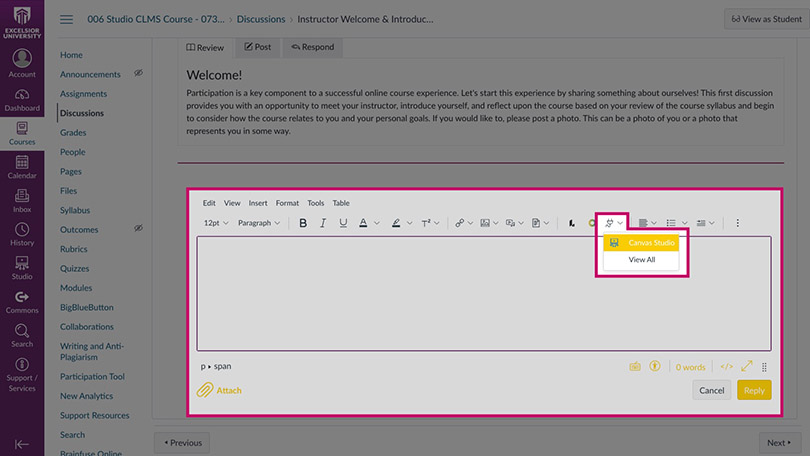
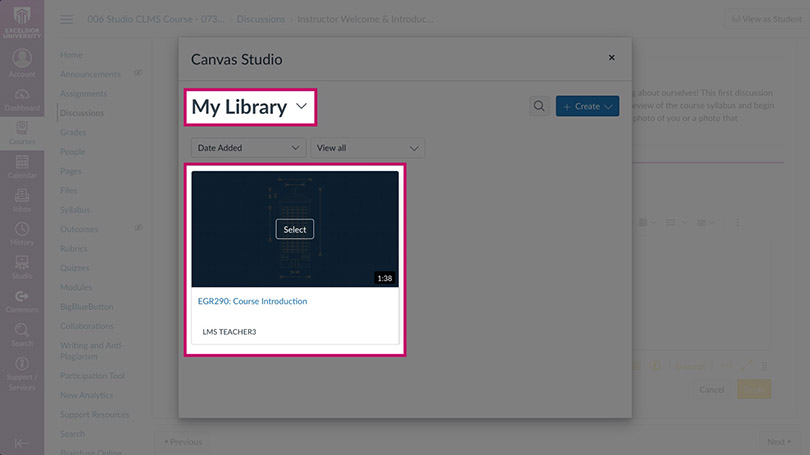
Ensure you are viewing videos in My Library, then hover over the video you wish to publish and click Select.
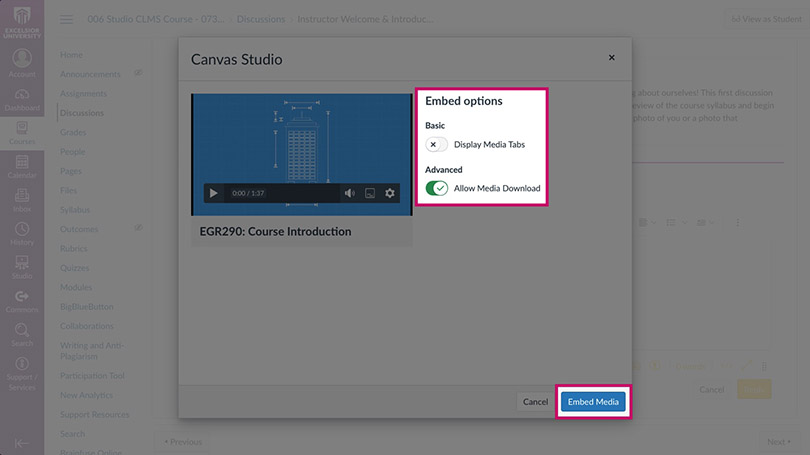
Disable Display Media Tabs and enable Allow Media Download, then click Embed Media.
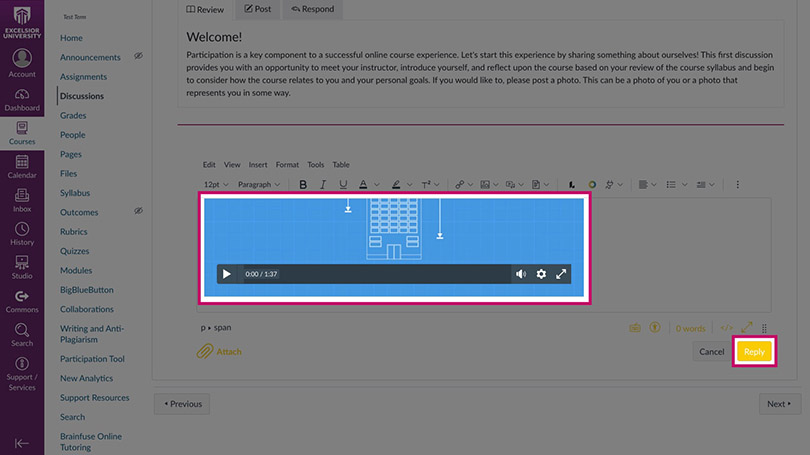
The video has been added to your post. Click the Reply or Publish button when you’re ready to submit your post.
Reminder: When you embed a video from My Library into a course, you are adding a copy of the video, not the original. Any changes made to the video in one location will not affect the other. They are separate and distinct from each other.
Note: Have feedback for us? We’d love to hear what you think! Your input helps us improve and ensure we’re meeting your needs. Please share your thoughts, suggestions, or any issues you’ve encountered.