Introduction
Images can strengthen online learning when their instructional purpose, relationship to the page content, accessibility, and usage rights are considered together. Use this four-step process to select, create, and incorporate images into a course.
One Question to Remember: Complete this sentence: “Students will use this image to _____.”
If you cannot identify a clear learning purpose, clarify the image’s role or leave it out.
1. Define the Image’s Learning Purpose
Before choosing an image, decide what instructional job it needs to perform.
Ask yourself:
- What part of the content would benefit from a visual?
- What should students notice or understand?
- How does this connect to the learning outcome?
Use an image only when it performs a clear instructional job. Visual interest, page layout, and breaking up text are not, by themselves, instructional purposes.
2. Choose the Right Visual
Match the learning purpose to the visual approach that communicates it most effectively.
Explain a Process
Best for: Helping students follow a sequence or understand change over time.
Useful formats: Flowcharts, timelines, and step-by-step illustrations.
Show Relationships
Best for: Showing how ideas, people, systems, or objects connect.
Useful formats: Diagrams, concept maps, and organizational charts.
Show What Something Looks Like
Best for: Helping students identify an object, environment, condition, interface, or characteristic.
Useful formats: Clear photographs, illustrations, and screenshots.
Compare Items or Ideas
Best for: Helping students notice similarities, differences, or changes.
Useful formats: Side-by-side images, before-and-after views, and comparison diagrams.
Reveal Patterns in Data
Best for: Helping students identify a pattern, trend, relationship, or important comparison.
Useful formats: Charts, graphs, and clearly labeled data visualizations.
Make a Concept Concrete
Best for: Helping students connect an abstract or unfamiliar concept to a meaningful visual representation.
Use carefully: The visual should clarify the concept, not simply decorate the page.
3. Ensure Every Student Can Access Its Meaning
Every student should be able to access the image’s purpose and essential meaning within the lesson. The image should be clear and readable at its normal course display size. For students who do not access it visually, a text alternative should serve the same instructional purpose.
Select Clear, Understandable Images
For students who view the image, check it in three areas:
Clear and Readable
The image is sharp and undistorted, and its text and labels are readable at the normal course display size on a laptop, tablet, or phone.
Easy to Perceive
Important elements have enough contrast, and labels, patterns, or symbols communicate meaning without relying on color alone.
Focused on the Learning Purpose
The image directs attention to its intended meaning without unnecessary or distracting visual detail.
Plan the Image and Page Content Together
Do not add an image simply to fill space or make a page more visually interesting. Begin with what learners need to understand, then decide what should be communicated through page text, what is best shown visually, and how the two will work together.
Start With the Learning Purpose
Identify the specific idea, relationship, process, or decision the image should help learners understand. If the image does not support a clear instructional purpose, reconsider whether it belongs on the page.
Give the Image a Specific Job
Use the image to communicate something that benefits from being shown visually, such as a sequence, comparison, structure, location, pattern, or relationship. Avoid adding images that merely repeat the surrounding text.
Keep Explanations in the Page Content
Use regular page text for instructions, definitions, context, and detailed explanations. The image should support that content rather than carry information that learners can access only by viewing the image.
Review the Image and Text as One Experience
Read the page with the image in place. The text should prepare learners to interpret the image, and the image should make the page content clearer or easier to understand. Revise or remove the image when the connection between the two is unclear.
Text Alternatives
Start by identifying what a text alternative should accomplish. Then determine what, if anything, the image requires and use the applicable writing guidance.
What Text Alternatives Should Do
Text alternatives communicate an image’s purpose and essential meaning to students who do not access it visually.
| Text Alternatives Should | Text Alternatives Should Not |
|---|---|
| Communicate the image’s purpose and essential meaning | Recreate the visual experience |
| Work with the surrounding page text | Repeat meaning already communicated nearby |
| Include details needed for the learning task | Describe every visible detail |
Determine What to Provide
Use the image’s role, complexity, and relationship to the surrounding page text to determine what is needed.
| What to Provide | When |
|---|---|
| No authored text alternative | The image adds no instructional meaning or function, or its meaning is already fully communicated in nearby page text. |
| Alt text | The image adds meaning that is not fully communicated nearby, and that meaning can be conveyed in a short phrase or sentence. |
| Alt text and a long description | The image conveys essential meaning that is not already available in the page text and cannot be communicated briefly. Before adding a long description, consider whether the page text should provide more explanation for every student. Use concise alt text to identify the image’s purpose, then provide a long description for the essential meaning that remains. |
Writing Alt Text
Write alt text that communicates what students need to understand or notice from the image.
- Include only meaningful words, labels, or details not already communicated nearby.
- Keep it focused and concise.
- Avoid file names and vague descriptions such as “graphic.”
Tip: AI can help generate text alternatives, but provide both the image and surrounding course content. The same image may need a different text alternative depending on its purpose within the lesson.
Example: Alt Text in Context
Course Excerpt
A temperature anomaly shows how much the annual global surface temperature differs from the 1951–1980 average. Annual values can reflect short-term conditions, while averages over several years help reveal longer-term patterns.
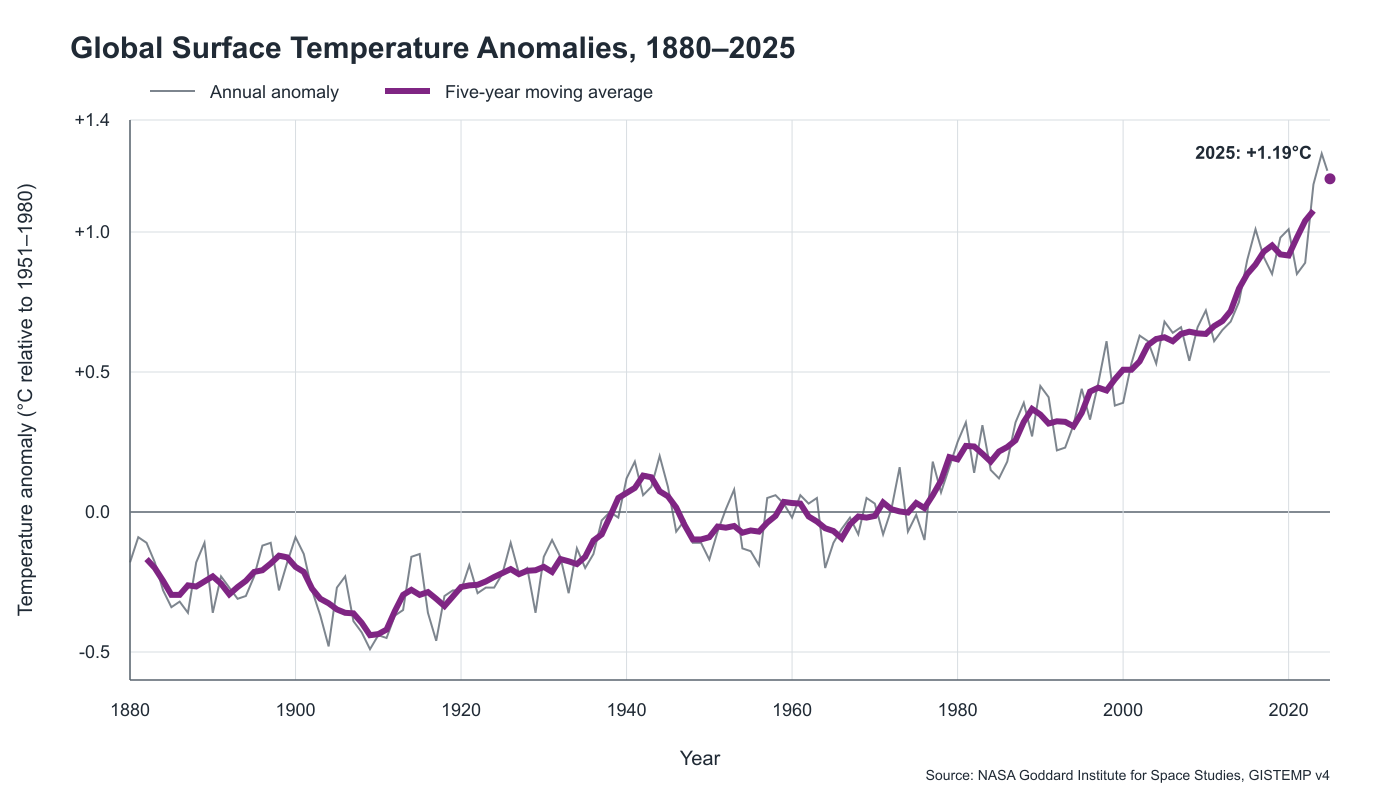
The graph shows annual anomalies alongside a five-year moving average, allowing short-term fluctuations to be viewed in relation to the broader pattern.
Alt Text Analysis
Effective Alt Text
Annual global surface temperature anomalies fluctuate from year to year, while the five-year average shows a sustained warming trend, particularly after 1980.
Ineffective Alt Text
Line graph with a gray line and a purple line. The horizontal axis shows years, and the vertical axis shows temperature anomalies.
The effective version communicates the pattern the graph is intended to show. The ineffective version describes its appearance without communicating that pattern.
Writing Long Descriptions
Explain the essential meaning that cannot be communicated briefly and is not already available in the page text.
- Include the data, steps, relationships, patterns, or conclusions needed for the learning task.
- Present the information in a logical order, using headings, lists, or tables when helpful.
- Work with the alt text and nearby page content without unnecessary repetition.
- Leave out details that do not support the instructional purpose.
Tip: AI can help generate text alternatives, but provide both the image and surrounding course content. The same image may need a different text alternative depending on its purpose within the lesson.
Example: Long Description in Context
Course Excerpt
The body maintains blood glucose within a relatively stable range through negative feedback. The pancreas detects changes in blood glucose and releases insulin or glucagon, which produce opposing responses involving body cells and the liver.
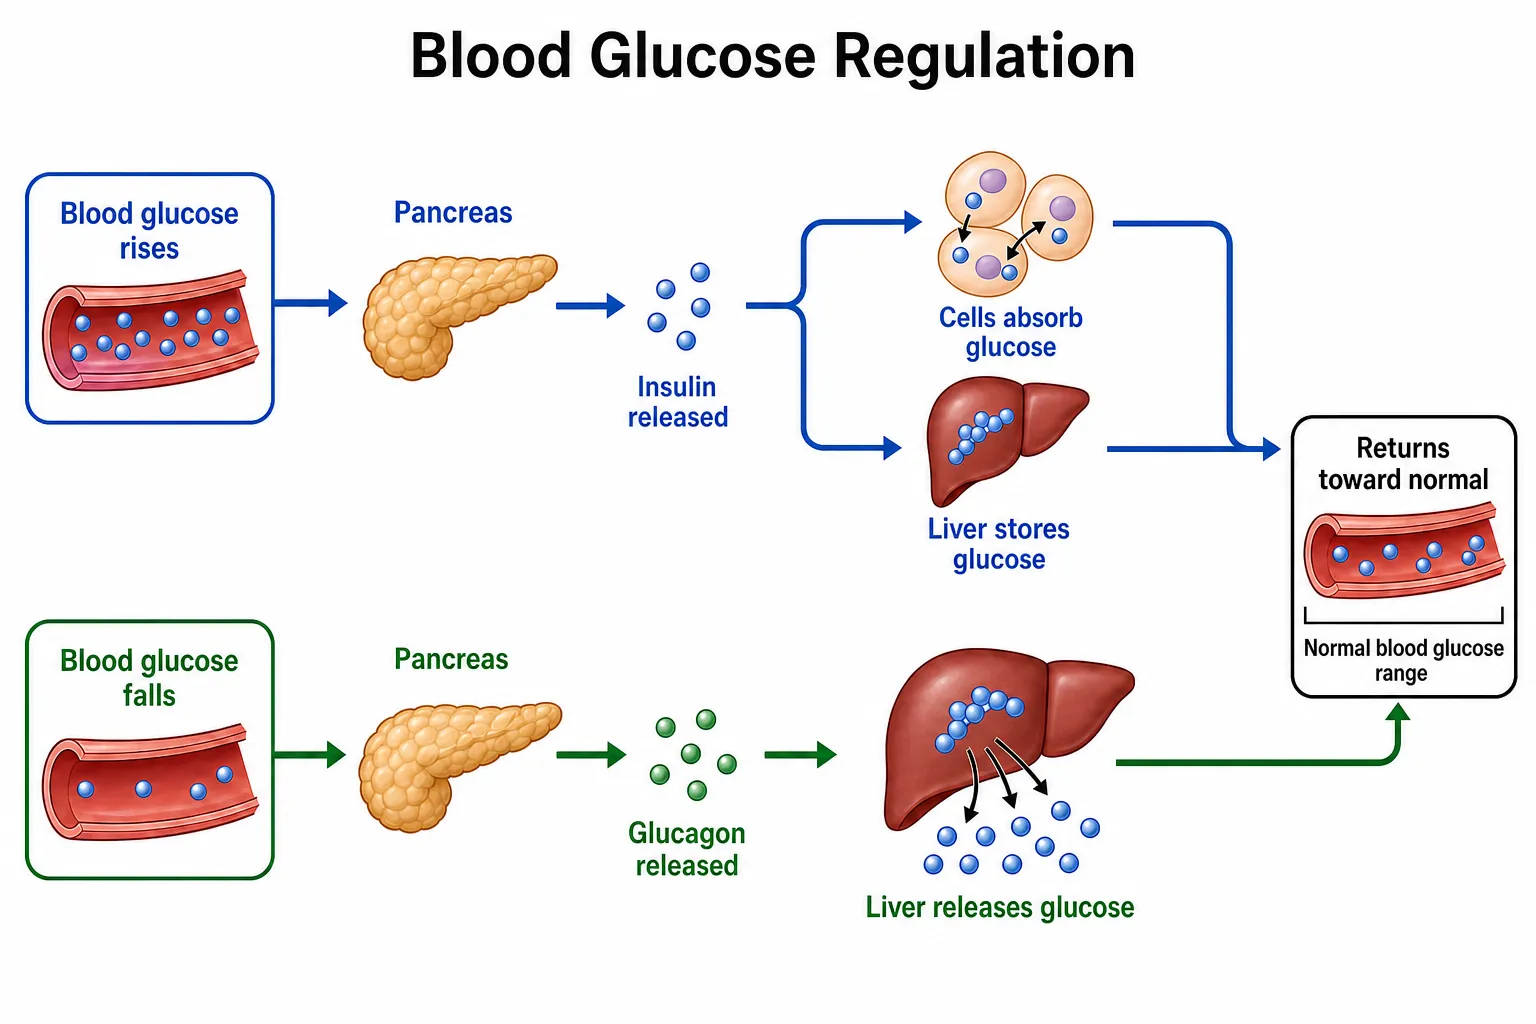
Together, these pathways return blood glucose toward its normal range under different conditions.
Text Alternative Used
Concise alt text: Insulin and glucagon regulate blood glucose through two opposing negative-feedback pathways. A detailed description follows.
Long Description Analysis
Effective Long Description
The diagram shows two pathways that end with blood glucose returning toward its normal range:
- When blood glucose rises, the pancreas releases insulin. Insulin causes body cells to absorb glucose and the liver to store glucose. These responses lower blood glucose toward its normal range.
- When blood glucose falls, the pancreas releases glucagon. Glucagon causes the liver to release glucose into the blood. This response raises blood glucose toward its normal range.
The two pathways have opposing effects, but both help maintain a stable blood glucose range.
Ineffective Long Description
The diagram is arranged in two horizontal rows. The upper row uses blue arrows and begins with a blood vessel containing several blue circles. It continues with an image of a pancreas, a group of blue circles, three body cells, and a liver. The lower row uses green arrows and includes another blood vessel, pancreas, group of green circles, and liver. Both rows connect to a box containing another blood vessel on the right.
The effective version communicates the sequence, relationships, and result of each pathway. The ineffective version describes the diagram’s appearance without explaining how blood glucose regulation works.
Design Consideration
In this example, the course text introduces blood glucose regulation but does not explain the two pathways, so a long description is needed. If the pathways were fully explained in the surrounding page text for every student, a separate long description might not be necessary.
What About Captions?
A caption provides shared context or directs attention to a specific part of an image. Use one only when it adds something not already clear from the image or surrounding page text, such as:
- Who or what the image specifically shows
- When or where it was created
- Why it matters within the lesson
- Which feature, relationship, change, or detail students should notice
Before adding a caption, ask: What unique context or focus does this caption add?
Do not use a caption to repeat the body text, describe the image in place of alt text, or add loosely related information simply because it may be helpful. A caption can work with a text alternative, but it does not automatically replace alt text or a long description.
Example: Caption in Context
Course Excerpt
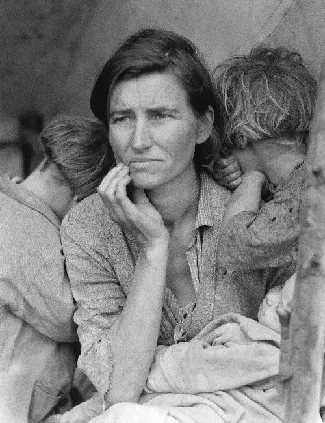
Dorothea Lange, Migrant Mother, Nipomo, California, March 1936. The photograph shows Florence Thompson with three of her children.
During the Great Depression, federally sponsored photographers documented poverty, migration, and agricultural labor across the United States. Their photographs brought individual experiences into public view and influenced how the economic crisis was understood.
Today, historians study these photographs as primary sources. The images provide evidence of the conditions people experienced, but they also reflect the purposes of the agencies that commissioned them and the choices of the photographers who created them.
These photographs were not neutral records. Decisions about framing, timing, subject, and publication helped shape how viewers understood the people and conditions represented.
Text Alternative Used
Concise alt text: A woman rests her chin on one hand while two children turn their faces away and lean against her shoulders; an infant sleeps in her lap.
Caption Analysis
Effective Caption
Dorothea Lange, Migrant Mother, Nipomo, California, March 1936. The photograph shows Florence Thompson with three of her children.
Ineffective Caption
A mother and her children during the Great Depression.
The effective caption identifies the photograph, photographer, subject, place, and date. The ineffective caption provides only a broad label that is already apparent from the image, alt text, and surrounding course content.
4. Confirm Permission and Attribution
Use an image only when Excelsior owns it, has permission or an appropriate license, the image is in the public domain, or a documented fair-use determination supports its use. Attribution does not replace permission or a fair-use analysis.
Confirm the Basis for Use
| Basis for Use | What to Confirm |
|---|---|
| Owned by Excelsior | Confirm that Excelsior owns the image or has documented rights that permit its use. |
| Permission or license | Confirm that the permission or license covers its use in the online course. Follow any restrictions on editing, sharing, or attribution. |
| Public Domain | Verify the public-domain status through a reliable source and record where the image was obtained. |
| Fair use | Follow Excelsior’s process for completing and documenting a fair-use determination. Educational use and attribution alone do not establish fair use. |
If the source or usage rights cannot be confirmed, do not use the image. Its appearance on a website, in a textbook, or in a presentation does not mean it is available for reuse.
Record the Source and Usage Rights
Keep the following information with the course materials:
- Creator or copyright holder
- Image title or brief description
- Original source or repository
- License, permission, public-domain status, or fair-use documentation
- Any required attribution wording
A search engine is a way to find an image, not its original source.
Provide Attribution When Required
Follow the requirements provided by the copyright holder, license, or source. An attribution may include the creator, image title, source, and license.
Attribution acknowledges the creator and source. It does not grant permission to use the image.
AI-Generated Images
Confirm that the AI tool’s terms permit the intended course use and record which tool was used. Review the output for logos, characters, artwork, or other protected content that may require separate permission. AI generation does not automatically guarantee that an image is cleared for use.
Bring It All Together
Effective instructional images result from considering learning purpose, visual design, accessibility, and usage rights together. Use this final checklist before adding or approving an image.
Clear Purpose
Does the image perform a clear instructional job connected to what students need to understand or do?
Right Visual
Does the visual approach communicate the intended meaning effectively?
Accessible Meaning
Is the image clear and readable, and can students who do not access it visually achieve the same instructional purpose?
Permission Confirmed
Are the source and usage rights documented, with attribution provided when required?
An image earns its place in the course when it supports a learning need, communicates its meaning to every student, and can be used responsibly. If it does not, revise it, replace it, or leave it out.
Additional Resources
The guidance on this page provides a starting point. Explore these resources for additional accessibility guidance, reusable image sources, and information about permissions, licensing, and fair use.
Image Accessibility
Guidance for informative, decorative, functional, textual, and complex images.
A quick tool for determining whether an image needs alt text.
Examples of text alternatives for graphs, diagrams, maps, and other complex images.
Practical examples showing how context changes the appropriate text alternative.
Check the contrast of text, labels, and meaningful graphical elements.
A customizable reference for WCAG requirements and supporting techniques.
Finding Reusable Images
Search images that are in the public domain or available under Creative Commons licenses. Always confirm the license on the original source page.
Find public-domain and openly licensed media. Requirements vary by image and may include attribution, a license link, or ShareAlike terms.
Library of Congress: Free to Use and Reuse
Browse curated collections that the Library has identified as free to use and reuse.
Find millions of images marked CC0. Permission and attribution are not required, although source credit is recommended.
Download images of public-domain artworks made available under CC0.
National Gallery of Art Open Access
Find high-resolution images of public-domain artworks available for free use.
Permission, Licensing, and Fair Use
Permission and Usage Rights
Understand the permissions and requirements associated with each Creative Commons license.
U.S. Copyright Office Fair Use Index
Learn about the four fair-use factors and review examples from court decisions.
Free Stock Images
Images are free under the Unsplash License. Attribution is appreciated but not required.
Images are free under the Pexels License. Attribution is appreciated but not required.